A BSOD, or Blue Screen of Death, is an issue that many of us have faced when using Windows. The term “blue screen of death” (BSOD) refers to when your computer displays a blue screen and then restarts. These BSODs come with a wide range of error messages that might assist us figure out what’s wrong.
The Faulty Hardware Corrupted Page is one of the categories in the BSOD family. This essay will go into this particular blunder in detail. The error message faulty hardware corrupted page appears in the bottom right corner of the screen. It can happen at any moment or during a specific activity, and it will restart your computer, just like any other BSOD.
Getting Rid of the Corrupted Page Caused by Faulty Hardware
Symptoms
The blue screen always appears unexpectedly while you are working on a Word document, downloading a very large application, or performing any other operation that you do not anticipate to be interrupted.
Faulty hardware corrupted page is one of the most prevalent BSOD errors in each Windows operating system generation, with a blue screen displaying a white text error message: “Your PC has encountered a problem and needs to restart.” We’re merely gathering some error data before restarting for you. (It’s just a tenth of the way through)… FAULTY HARDWARE-CORRUPTED PAGE.”
Causes
You’re probably wondering what’s causing this blue screen issue. Some of the causes have already been stated. Try to figure out which one applies to your situation.
- A program/installation application’s or uninstallation is incomplete.
- A malware/virus that attacked your computer and damaged system or system-related software files.
- During the Windows 10 upgrade, I’m getting a blue screen of death.
- Old or corrupted device drivers that have been incorrectly setup.
- After installing new hardware, there is a driver conflict.
- Due to a recent software upgrade, the Windows registry has been corrupted.
- deleting or causing damage to system files
- Bad sectors on a hard drive, or a hard disc that is damaged or corrupted.
1. Updating Drivers is the first step in troubleshooting.
To begin, update your system’s drivers, particularly the Display Drivers. This should be your first step, especially if the issue began after a Windows 10 update. It’s easy to update your drivers, and it only takes a few minutes.
To update your drivers, follow the instructions outlined below.
- Press R on your keyboard while holding down the Windows key.
- Press Enter after typing devmgmt.msc.

- Double-click Display Adapters to open it.
- Choose the Update driver from the context menu when you right-click your Display Device.
- Select the option to “Automatically search for updated driver software.”

- The PC will need some time to look for an updated version of your device driver. Update the driver if it finds one. Continue to the further step if it does not.
- Close the Driver Software Update window.
- Double-click your Display Device in the Device Manager window.
- Select the Drivers tab.
- Keep this window open or simply take note of the driver version.
- Go to the manufacturer’s website for your display driver. Look for your display device driver on the internet and see if there is a newer version for your device. If this is the situation, you should upgrade your software to the latest version.
- To return to the Device Manager window, click the back arrow.
- Select Update Driver from the context menu of your Display Device.
- Look for driver software on my computer on your desktop by clicking Browse my machine.
- Click the Browse button.
- Select the newest driver version from the place where it was obtained. Click the Open button.
- After that, click Next and vividly follow the on-screen instructions.
After you’ve completed these instructions, restart your computer to see if the faulty hardware corrupted page problem reappears.
If the advice above doesn’t work, remove your drivers and let Windows deal with the problem. As a result, if Windows cannot discover any installed drivers for your device, it will automatically install the most appropriate drivers. Because Windows has its own generic drivers, uninstalling your drivers and letting Windows handle the drivers may be worth a try.
Check out the steps listed below to see if they work for you.
- Press R on your keyboard while holding down the Windows key.
- Press Enter after typing devmgmt.msc.
- Double-click Display Drivers to open it.
- Select Uninstall device from the right-click menu of your Display Device.
- Any Additional Prompts should be confirmed.
Restart your computer after the driver has been removed. When you restart your computer, Windows will install a generic driver. Check to see whether the issue persists after completing these steps. If there are no BSODs, the problem is most likely with your drivers. You now know that the most recent version was the source of the BSOD. As a result, you should either maintain the generic ones or try to install an older version of your manufacturer’s driver.
2. Turn off the Fast Startup feature.
Another easy fix for the issue is to disable rapid startup. When compared to a normal starting, the fast startup makes your computer start up much faster. This might cause issues since the quick starting time may not allow your drivers or apps to fully load.
- Press R on your keyboard while holding down the Windows key.
- Enter the command powercfg.cpl.
- Choose the option that states “Choose what the power buttons do” from the drop-down menu.
- Select the option of “Change settings that are currently unavailable” from the drop-down menu.
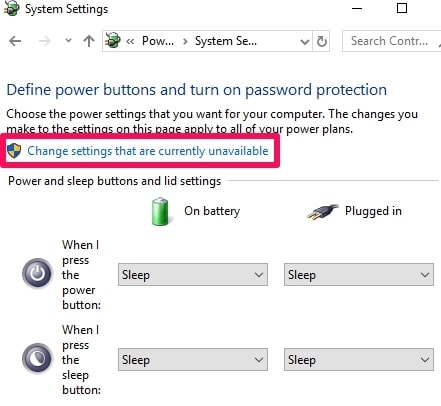
- Uncheck the box labelled “Enable rapid startup” (recommended). It should be located in the Shutdown Settings section.
- Save the changes you have made by clicking the Save button.
- Check to see whether this is still present after restarting your computer.
3. Examine your computer’s RAM.
Checking the RAM and removing or replacing the bad RAM is another solution to the Faulty Hardware Corrupted Page problem.
Remove the RAM, clean it, and clear any dust from the slots before reinstalling it. After that, double-check that the RAM is correctly attached. After you have done that, restart your computer to see if the same problem still persists. If the problem persists, use the Windows memory diagnostic tool to check your RAM.
4. Using the Memory Diagnostic Tool in Windows
To use the Windows Memory Diagnostic tool, follow the instructions below —
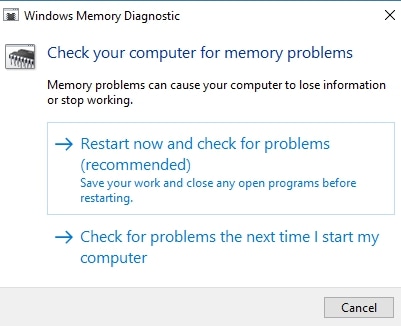
- Press R on your keyboard while holding down the Windows key.
- Enter the command mdsched.
- Choose the option on your device to “Restart now and check for problems (recommended)”.
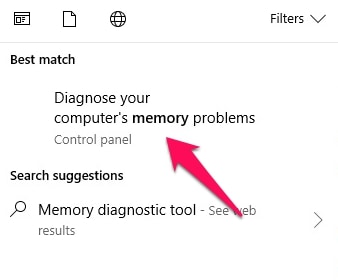
If this does not work, proceed to the steps below:
- Once, press the Windows key.
- In the Start Search box, type Memory diagnostic tool.
- From the search results, right-click Windows Memory Diagnostic and select Run as administrator.
- Check for issues by clicking Restart Now (recommended).
- Windows will instantly restart, and the testing will begin. When the testing is completed, your computer will restart automatically, and you will be able to check the test results when you log back into Windows. These results can help you figure out if you need to upgrade your RAM.
5. Testing by hand
If you have spare RAM, you may also perform manual testing. You can try replacing your RAM with fresh or used RAM (from another machine) to see if the fault persists. Check to see if the RAM is compatible with your system and in good working order.
If changing your RAM solves the problem and does not result in a blue screen of death (BSOD), your RAM is most likely the source of the problem. After you’ve finished testing, replace the RAM with a newer or functional one.
6. Examine your computer hardware
Your hardware might sometimes be the source of the faulty hardware corrupted page problem. As a result, any recently installed hardware should be removed because it may not be compatible with your PC. If you haven’t installed any new hardware, you should double-check that everything is in working order. These issues are usually caused by RAM, but you should also check your motherboard, hard drive, network adapter, and other components.
7. Make changes to the Intel Management Engine Interface (IMEI)
The issue might also be caused by an out-of-date or malfunctioning IMEI driver. This error can be fixed by updating the IMEI driver:
- Go to Intel’s support website. To download, click the blue button.
- After you’ve downloaded the file, follow the on-screen directions to install it.
- Restart your computer when the installation is complete for the new driver to take effect.
Conclusion
We hope you find these faulty hardware damaged page troubleshooting techniques helpful. If you know of another approach that works for you, please let us know. Please leave your thoughts in the section below.